How to Read a Museum Floor Diagram Before You Arrive
Read a museum floor diagram to connect galleries, levels, and shared spaces, then plan a flexible visit around the rooms and facilities that matter to you.
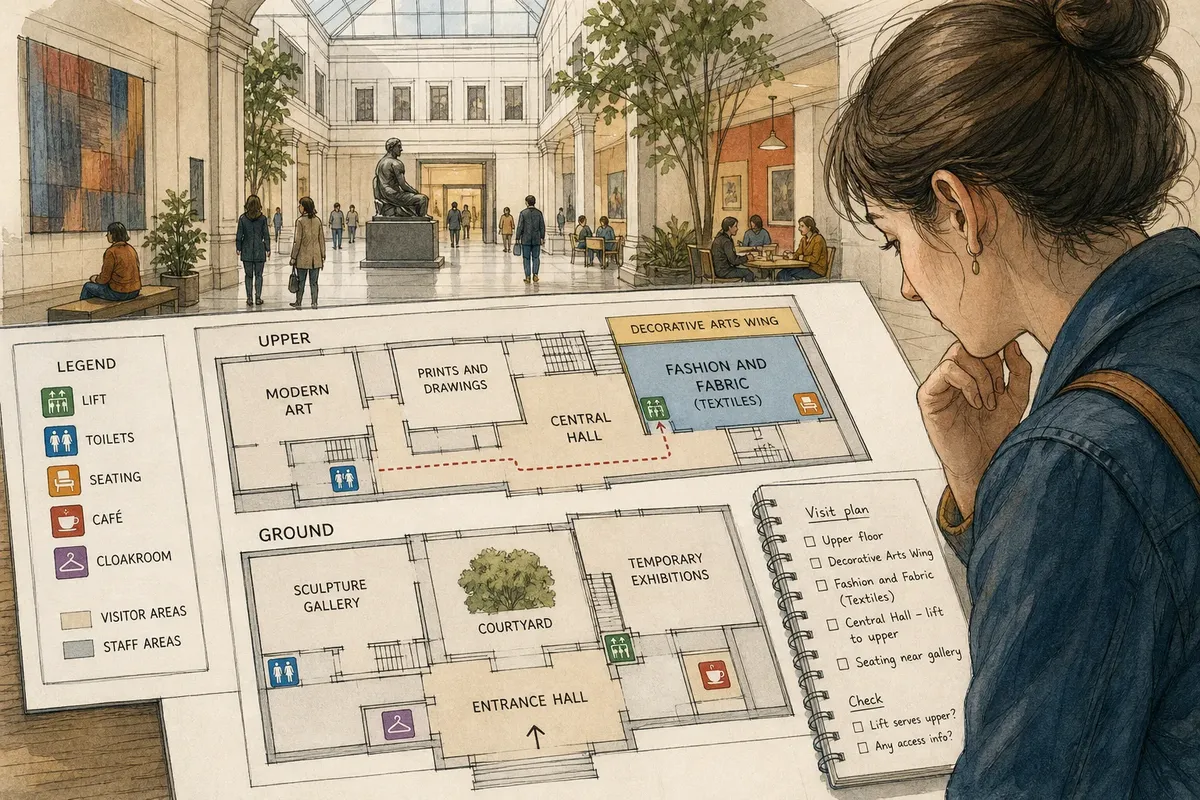
The most common mistake with a museum floor diagram is treating it like a route to trace rather than a model of how the building is organized. That can leave you focused on turns while missing the more useful clues: which galleries share a wing, where a level changes, and how public spaces connect. Read the drawing for relationships first, and your visit plan can stay flexible.
A museum floor diagram can help you understand the building before you arrive, even if you do not memorize a route. It can reveal how collections are grouped, which areas open onto a shared hall, and where facilities sit in relation to your destination.
See how the museum groups its spaces
Begin with the diagram’s title and floor labels. Check whether it shows one level, several levels, or only visitor areas. Then look at how galleries are grouped: a named wing may contain several rooms, while a temporary exhibition may occupy a space beside a permanent collection.
Room labels are clues to the museum’s organization, not a promise that similarly colored rooms serve the same purpose. A large central hall, courtyard, or atrium may separate two galleries that appear close on the page, or provide a shared place to pause between them.
Pay attention to connections between spaces. A narrow corridor or stairwell may be the link between two sections, while a broad public area may serve as a crossroads. The drawing may simplify room shapes or spacing, so use it to understand the arrangement rather than judge exact distances.
Read the diagram’s visual hierarchy
Floor diagrams often give some information more visual weight than others. A bold outline may separate visitor areas from staff-only rooms; a shaded block may highlight an exhibition or wing. Check the legend and labels to see what the graphic choices mean before drawing conclusions from color or line weight alone.
Notice what the diagram places at its center. A prominent atrium or entrance hall can orient the rest of the layout, while small labels may identify quieter details such as a cloakroom or seating area. This visual hierarchy helps you decide which parts of the drawing deserve attention for your visit.
Say you are planning to see a ceramics gallery. The diagram groups it inside a wing labeled “Decorative Arts” and places a courtyard between that wing and the entrance hall. You can note the wing and courtyard as useful landmarks, then check the gallery’s posted name on arrival; the result is a simple mental picture without assuming the courtyard is the only way in.
Use facilities and access details as planning clues
A diagram may show toilets, lifts, stairs, seating, cafés, or cloakrooms. Compare each symbol with the legend, then note its position relative to the galleries you expect to visit. If the drawing omits a feature your group needs, or uses a symbol whose meaning is unclear, ask museum staff rather than guessing.
For access questions, treat the diagram as a starting point, not the full answer. It may mark a lift or step-free entrance without describing every route condition or temporary closure. Check the museum’s current access information, and contact a qualified staff member if your plans depend on a particular arrangement.
Consider comfort as well as movement. A seating area near a gallery may offer a convenient place to regroup; a café beside a shared hall may make a natural pause. These are useful possibilities to notice, not assumptions about what any visitor will need.
Which details should you confirm before your visit?
Does a museum floor diagram show exact distances?
Usually, its purpose is to show how spaces relate, not to provide precise walking distances. Use it to identify connections and level changes rather than estimate how long a journey will take.
How can you tell which facilities are on your floor?
Match the floor label to the diagram’s outline, then compare facility symbols with the legend. If one drawing combines levels or leaves a symbol unexplained, ask the museum to clarify its location and meaning.
Can a floor diagram show step-free access?
It may mark lifts, ramps, or step-free entrances, but it may not explain every route detail. Compare the diagram with current access information and contact museum staff if a specific arrangement affects your plans.
What should you do if two galleries look close but have no visible connection?
Look for a shared hall, corridor, doorway, or route between floors, rather than relying on their apparent closeness on the page. If the connection is still unclear, ask staff how visitors move between those areas.
Turn your observations into a flexible visit plan
Rather than writing down every turn, save a few observations: the level and wing of your main destination, a nearby shared space, and any facility or access detail that may shape your visit. Mark unresolved questions so you know what to confirm.
- Floor label: If the destination appears on a clearly named level, note that level; if the diagram combines levels ambiguously, check the museum’s floor information instead.
- Wing and room names: If the gallery has a clear room label within a named wing, record both; if several labels might match your destination, check the museum’s visitor information.
- Shared spaces: If a hall or courtyard connects areas you plan to visit, note it as a landmark; if the drawing does not show a connection, ask whether the spaces link directly.
- Facility symbols: If the legend identifies a nearby toilet, seat, or café, note its location; if a symbol is unclear or absent, ask staff rather than relying on a guess.
- Level changes: If the diagram shows a lift or stairs serving your destination, note the marked connection; if it does not show how to reach that floor, contact the museum for guidance.
- Access requirements: If the diagram marks the feature your group needs, compare it with current access information; if the details are missing or uncertain, contact a qualified staff member before planning around them.
Imagine your starting information is a museum webpage that names “Textiles” as your destination, a diagram with “Ground” and “Upper” floor labels, and a legend marking lifts, toilets, and seating. First, you match “Textiles” to a room labeled “Fashion and Fabric” on the upper floor. Next, you note a lift beside the central hall and seating near that gallery. Then you compare the lift symbol with the current access page. If the page confirms the lift serves the upper floor, your plan is to use the central hall as a regrouping point; if it does not, you contact the museum for another route. The resulting plan identifies a likely destination and a useful shared space while making the access question explicit.
Allow for details the drawing cannot settle
A floor diagram represents the building; it does not necessarily show the day’s room status. Exhibitions can move, facilities can close, and temporary arrangements can change how visitors enter or circulate. Check current notices or ask staff about details that could affect your visit.
The most useful notes from a museum floor diagram are often about relationships: which rooms belong to a wing, what shared space links nearby areas, and where a facility sits in relation to a destination. Keeping those relationships in mind makes the diagram easier to use, even when your plans change.